Portfolio Website Hosting Guide
In this guide, I will walk you through my personal experience and tools I used for my own personal portfolio page.
As a Singaporean, it is without a doubt that I will sail the seven seas just to find the cheapest way (free) to do something. In this case, I have found a way to obtain free domain name and host it for free on Heroku.
Disclaimer: This guide is accurate as of 27 Dec 2021 and the tools I used might not be available by the time you read this.
Free Hosting on Heroku
Follow this video guide if you prefer video guides or this medium article if you prefer blog articles.
My portfolio page is created using ReactJS and these are the steps to host a React App on Heroku.
Steps:
- Create an account on Heroku
- Connect your Github account to Heroku
- Add React Buildpack to Heroku as the default is NodeJS Buildpack
https://github.com/mars/create-react-app-buildpack

- Choose the branch you want to deploy and enable automatic deployment
Heroku has implemented a feature to prevent abuse of its platform called Dyno Hours. Active apps on your heroku account will consume dyno hours and on the free plan, apps with no web traffic in a 30-minute period will go to sleep.
This is not desirable for a portfolio page as your potential recruiters may look up your website at any point in time and they are going to be real disappointed if your website takes about a minute to load. Personally, I only have patience of about 5 seconds waiting for a page to load up before thinking that the website is laggy.
Personal accounts with credit card verification will received 1000 free dyno hours each month. If you only have one app running for all 30 days of the month -> 30 * 24 hours = 720 hours. Which means that we can let our app run for the entire month and we have to find a way to prevent it from sleeping.
New Relic add-on on Heroku to send ping to your domain every 30 minutes and this will keep your app from sleeping. You can also explore this add-on for some additional monitoring information.
Free Domain Name
Freenom is the site I used to get my free domain name - shaokiat.vercel.app
Check out this video guide to get your custom domain from Freenom.
Steps:
- Create an account on Freenom and search for the domain name that you want that is available on freenom
- Once you have obtained your free domain name on Freenom, add this custom domain to your Heroku app as shown below
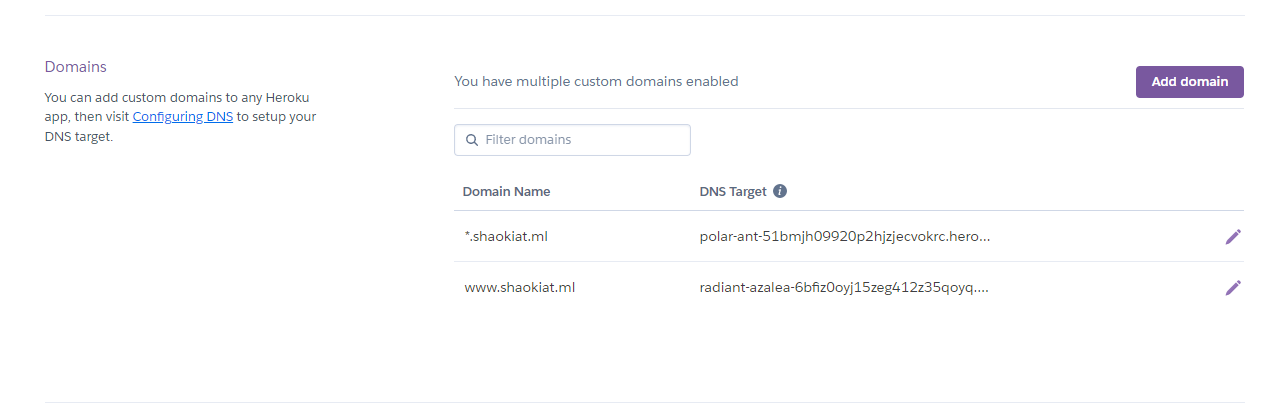
Do not worry about the DNS Management over at your Freenom account for now as we will configure that later on with our SSL certificate on Cloudflare.
Free SSL Certificate
Some in-built browsers only allows access to secure websites with SSL certificate which are websites that begins with https://
instead of http:// so it is crucial that we add SSL certificate to our website.
Cloudflare provides free SSL certificate for life!
Check out this video guide for the configuration of your website.
Steps:
- Create a Cloudflare account and add your custom domain
- Add the Cloudflare nameservers assigned to you to the custom nameservers in your Freenom account as shown below
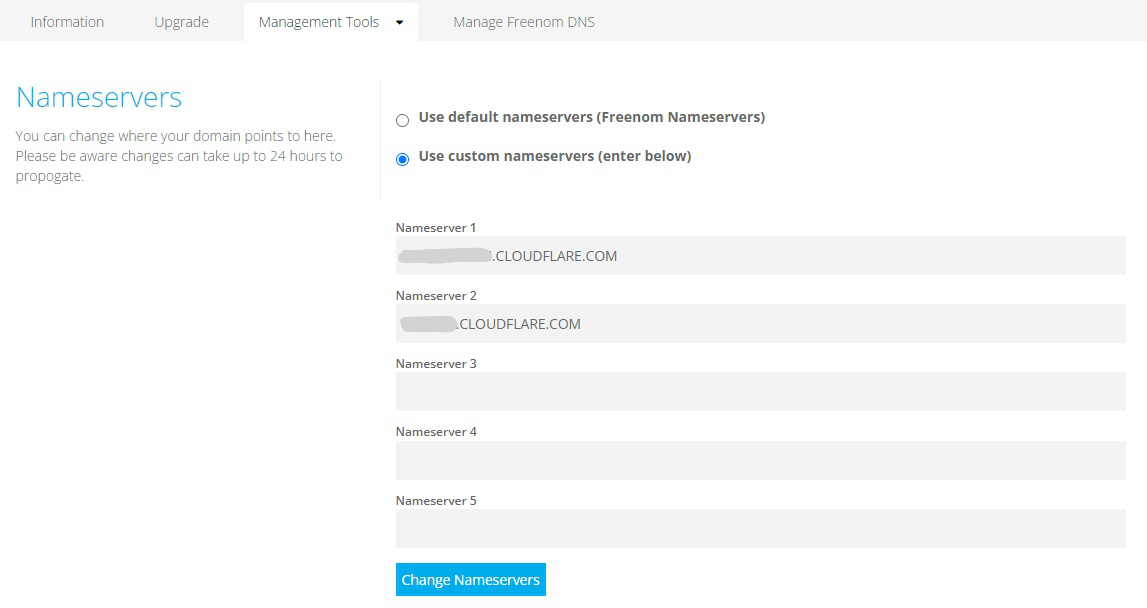
- Select
Always Use HTTPSand we are done!
Great job!! You have now hosted your website on your own custom domain! 🥳🎉🎉